


Foundation Friday: Malasana
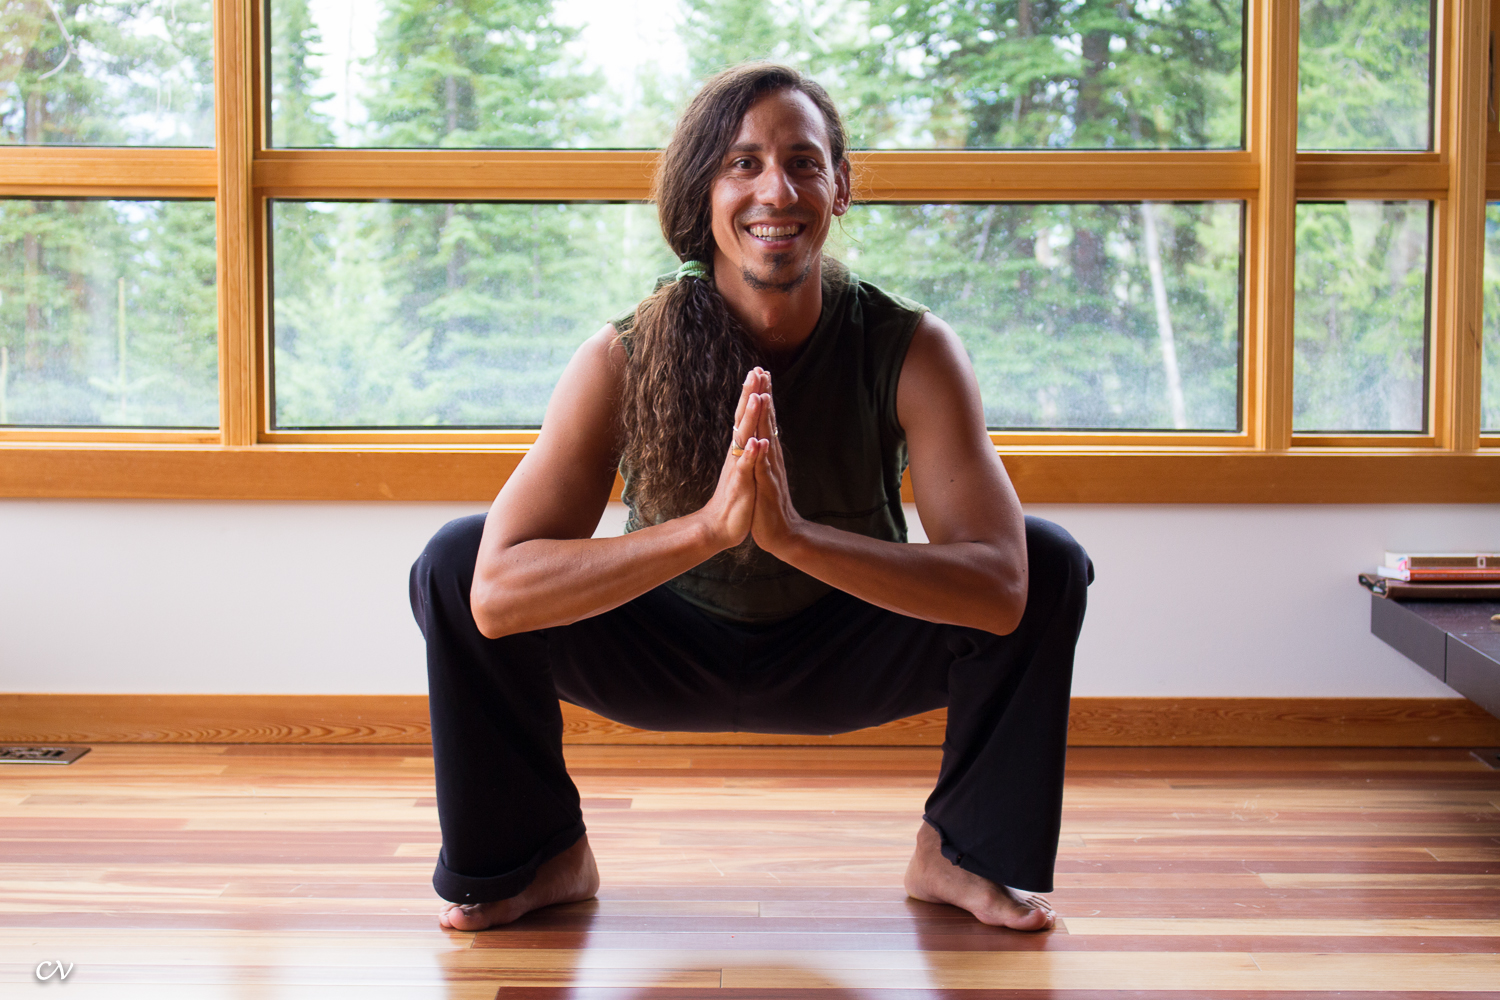
This post is an instalment in a series that delves into the basics of yoga—looking at its postures (asana), breath (pranayama), philosophy, and all the other essentials—giving you the foundations upon which to build a solid practice. Today's focus will be on Malasana, or Garland Pose.
Foundation Friday: Malasana
Pose, or Asana Garland Pose, or "Yogi Squat" mah-lah-sah-nah

In conjunction with our monthly theme, Malasana is one of the ultimate grounding yoga postures. The rooting through the feet, the closeness of the pelvis to the earth, and the general feeling of heaviness and surrendering to the weight of gravity in this posture all encourage a downward flow of energy. Malasana's energetic qualities are calming, soothing, and quieting for the busy mind, as this asana activates a flow of prana down through the body, towards the ultimate source of grounding—the earth.
Many Eastern cultures are accustomed to sitting on the floor for meals and meetings, or squatting comfortably as they go about their daily activities— whereas In our Western world, we spend so much of our lives seated in chairs, car seats, or on couches. We lose the softness and suppleness of our hips, calves, and ankles, and the strength of our low back, thighs, and core. Physically and energetically, malasana helps to counteract these losses.
Malasana may help…
- Tone your thighs, glutes, and calves
- Strengthen your low back and abdominal muscles
- Open through your hips and inner thighs
- Aid in digestion and elimination
- Soothe anxiety and promote calm

So, how do I get there?
- Start standing with your feet about mat-distance apart. Turn your toes slightly outwards.
- Lower your hips in between your legs. Keep your heels on the floor if you can, or support them with a folded mat or towel. You might even try this posture with a prop—like a block, or bolster under your seat.
- Draw your hands into anjali mudra (prayer position) and slide your shoulders back. Press your outer elbows into your inner thighs, and vice versa. If this is too much, keep both of your hands on the floor in front of you for support.
- Lengthen your tailbone down towards the earth—like gravity is pulling it lower—but lengthen the crown of your head higher to elongate your spine.
- Broaden the front of your chest.
We hope this helps you better malasana, or garland pose. Please feel free to comment on our Facebook with any further questions. And let us know if you have something you would like to see featured in Foundation Friday!

Foundation Friday: Anjaneyasana

This post is an instalment in a series that delves into the basics of yoga—looking at its postures (asana), breath (pranayama), philosophy, and all the other essentials—giving you the foundations upon which to build a solid practice. Today's focus will be on Anjaneyasana, or Crescent Lunge Pose.
Foundation Friday: Anjaneyasana
Pose, or Asana "Crescent Lunge Pose" ahn-jahn-eh-yass-a-nah

Anjaneyasana, or Crescent Lunge Pose is a posture you'll find in nearly every yoga class. You might find yourself in an Anjaneyasana variation with your back knee lifted or lowered, toes tucked under or not, perhaps in a slight back bend, or with your arms reaching back like you're a runner about to leap off your starting block. Lunges strengthen and stretch the feet, legs, hips, core, back, and even the shoulders and arms—this posture gets your whole body involved!
Anjaneyasana may help…
- Relieve symptoms of sciatica
- Build stabilizing muscles in your legs
- Open through your hips, shoulders, groin, armpits, and neck
- Strengthen your thighs, calves, arches, back, shoulders, and arms

So, how do I get there?
- From Adho Mukha Svanasana (Downward Facing Dog), step your right foot up in between your hands. Or, from Tadasana (Mountain Pose), bend your knees and take a long step back with your left leg. Ensure your legs are hip-distance apart.
- Lunge into your front leg—bend your front knee to a 90-degree angle, while ensuring your stance is long enough that your front ankle lines up directly underneath your knee.
- Choose to lower your back knee (low lunge), or keep it lifted (high lunge). *If lowering your back knee bothers your knee joint, you can place a foam composite block underneath that knee, or fold your mat over to offer the joint extra padding.
- Press your front foot down strongly to lift your torso so that it's vertical, stacking your shoulders over your hips.
- Squeeze your inner thighs towards each other to press your right hip back and your left hip forward, so your hips are square.
- Root your tailbone, but lengthen up throughout your spine to the crown of your head.
- Reach your arms skyward, slide your shoulders back and down your spine, and fan your fingers out wide.
We hope this helps you better anjaneyasana, or crescent lunge pose. Please feel free to comment on our Facebook with any further questions. And let us know if you have something you would like to see featured in Foundation Friday!
Foundation Friday: Pada Bandha

This post is an instalment in a series that delves into the basics of yoga—looking at its postures (asana), breath (pranayama), philosophy, and all the other essentials—giving you the foundations upon which to build a solid practice. This post focuses on one of the "bandhas", or "locks"—in what might be our most literal "Foundation" Friday yet!
Foundation Friday: Pada Bandha
Lock, or Seal ("Bandha") Foot Lock, or “Pada Bandha” pah-dah bahn-dah

First off—what is a bandha?
The sanskrit word "bandha" translates to lock, seal, or closure. During asana (postural) or pranayama (breath work) practice, bandhas help to energetically "lock" in energy and prana (life force), consciously sealing it inside of our bodies so that it can aid us in our practice. There are three main internal bandhas, one "mother" bandha, and two stabilizing, grounding bandhas—pada bandha, as we'll look at today, is of the stabilizing, foundational variety.
What then, is pada bandha?
Pada, in sanskrit, means "foot"—so pada bandha, is then a "foot lock," or "foot seal." It is a sealing of your connection—or a rooting—with the earth beneath you. It is a solid foundation upon which you can balance. It's a way to get acquainted with all the tiny, underused muscles in your feet (all twenty of them!).
Pada bandha may help…
- You to feel more energized by "locking" your energy in
- Give a sensation of "grounding" while simultaneously lifting (may aid in anxiety or depression)
- Protect your knees
- Support your balance
- Alleviate problems with fallen arches
- Strengthen your legs
- Activate mula bandha (more on that to come!)

So, how do I get there?
- Take a good look at the bottom of your foot.... get really up close and personal! Notice its curvatures, and its raised and recessed areas. Thank them for all the work they do—these feet are what support you, day in and day out!
- Find the four corners of the sole of one foot—the mound of your big toe and pinky toe, and your inner and outer heel. From standing, place your foot down on an even surface and press each of those four corners down evenly.
- Pick up all five of your toes and spread them away from your foot and as far apart from each other as you can.
- While still pressing down through your "four corners," and with your toes lifted, draw, or squeeze the ball of your big toe mound towards your inner heel, and your inner heel towards the mound of your big toe in a way that lifts your arch. Without releasing through the inner edge, do the same with the mound of your pinky toe, and your outer heel. Perhaps you might notice your ankle lift slightly, or feel like you can draw the strength of your feet up your whole leg.
- Keeping all of the engagement you found in Step 4, place your toes back down—one at a time if you can—still spread widely, almost as if you had webbed feet, or spacers in between your toes (this is what we like to call "yogi toes!").
- Do the same with your other foot.
We hope this helps you better understand the concept of pada bandha. Please feel free to comment on our Facebook with any further questions. And let us know if you have something you would like to see featured in Foundation Friday!

Foundation Friday: Downward Facing Dog
This post is an instalment in a series that delves into the basics of yoga—looking at its postures (asana), breath (pranayama), philosophy, and all the other essentials—giving you the foundations upon which to build a solid practice. This post focuses on the ubiquitous downward facing dog.
Foundation Friday: Downward Facing Dog
Pose, or "Asana" Downward Facing Dog, or “Adho Mukha Svanasana” odd-oh mook-ah shvah-nass-ah-nah (not to be confused with savasana)

Why do we practice downward facing dog?
Downward dog is probably one of the most prevalent of all yoga postures. Though it may not feel like one when you first begin practicing, downward facing dog is actually a resting pose, and is often offered as a break between sequences, or as a starting and finishing point in a flow, or vinyasa. This pose will likely be taught in your first-ever beginner's class, and will carry you through as you advance your practice—downward dog is a quintessential pose, so it's important to get your alignment, er... down!
Downward dog may help…
- Calm the mind, relieving stress and mild depression
- Energize your body
- Stretch your shoulders, hamstrings, calves, arches, and hands
- Strengthen your arms and legs, which acclimatizing you to weight-bearing in your arms
- Improve digestion
- Offer relief for sinus pain, headaches, insomnia, back pain, and fatigue
- Ease conditions of menopause, high blood pressure, asthma, flat feet, and sciatica, and prevent osteoporosis
Traditional Chinese Medicine and acupuncture tend to favour Downward Facing Dog for its activation and extension of the Bladder Channel, the longest channel in the body. According to their perspective, elongating the spine throughout this posture aids in strengthening immunity, among a host of other benefits.

How do I get there?
- Start from a table top position, on your hands and knees. Place your hands slightly wider than shoulder distance apart and spread your fingers wide.
- Turn your hands so that the space between your pointer finger and your middle finger points to the top of your mat.
- Press down through the four corners of your hands, especially the mound of your thumb and pointer finger, while gripping your mat with your fingertips.
- Tuck your toes under, and press your hips up so that your body looks like an inverted pyramid from the side.
- Squeeze your forearms towards each other, and roll your upper arms away from each other.
- Ensuring your feet are hip-distance apart, take a soft bend into your knees and press your heart back towards your thighs.
- Roll your inner thighs back and wide behind you.
- Tilt your sitting bones skyward, and draw your tummy in towards your spine.
- Hug your shins towards each other, and press your heels down towards your mat (but it's okay if they don't touch!)
- Look between your feet, shins, thighs, or upwards at your belly.
If this position is uncomfortable, you can:
- Place your hands on blocks if your shoulders are quite tight
- Prop a towel, rolled mat, or some small sort of padding underneath your palms to alleviate pressure on your wrists
- Take a bigger bend into your knees if your legs are tight
- Support your head with a bolster or a block
- Or, start from standing with a wall or chair in front of you, then bend at your waist and press your palms into a wall or chair instead of the floor. Progress by walking your hands lower towards the earth as the posture becomes more accessible.
We hope this helps you better understand the concept of downward facing dog. Please feel free to comment on our Facebook with any further questions. And let us know if you have something you would like to see featured in Foundation Friday!
Categories
- Wellness 241
- Zen Habits & Inspiration 100
- Yoga Specific 54
- Yogalife Workshops, Retreats & Trainings 37
- What's Going On 35
- Workshops 34
- Anatomy & Information 30
- Injury Prevention & Health 30
- Foundation Friday 25
- Instructor Stories 22
- Studio Information 17
- Community Event 15
- Yogi of the Month 13
- Recipe 11
- Staff Adventures & Journeys 10
- YEG Highlight 8
- Yogalife Classes 7
- Karma Program 5
- Member Stories 5
- Registered Classes 4
- Physical Health 3
- Curated Playlists 2
- Mental Health 2
- Classes 1
- Pregnancy & Family 1
- Prop Specific 1
- Relaxation 1